Common Troubleshooting Cases
Live Video Viewing Faults
Video Stutters When Live or Recorded Video Is Played on the LDU
Symptom
After a camera that supports intelligent encoding or SuperCoding is connected, video stuttering occurs during live video viewing and recording playback on the LDU.
Possible Causes
The intelligent encoding or SuperCoding function has been enabled for the camera on the LDU.
Solution
- Log in to the LDU as the admin user. (
 Logging In to the LDU)
 - Click
 in the upper left corner to access the main menu.
 - Choose .
- Click the camera to be configured in the camera list.
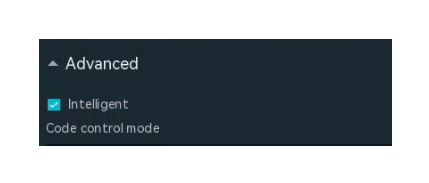
- On the Main Stream tab page, check whether the check box next to Intelligent is selected, as shown in Figure 6-58.
- If so, go to 6.
- If not, contact technical support.

The SuperCoding function is available only for some camera models.
Live Video Streams Fail to Be Pulled Repeatedly on the iClient S100
Symptom
After you add an IVS1800 to the iClient S100, connect a camera to the IVS1800, and view live video from the camera, streams fail to be pulled repeatedly on the live video viewing page.
Possible Cause
The iClient S100 client version does not match. For details about the iClient S100 client version matching the HWT-IVS1800, see Obtaining Reference Documentation.
Solution
Perform the following steps to upgrade the iClient S100 version and then view live video from the camera:
- Visit the HOLOWITS website, and search for and select iClient S100.
- Download and install the iClient S100 software package by referring to Downloading and Installing the iClient S100.
- Log in to the iClient S100 and check whether live video streams can be properly pulled.
- If so, no further action is required.
- If not, contact technical support.
Recording Faults
Time Superimposed on the Image Is Different from That on the Timeline During Recording Playback
Symptom
When you play back a recording on the Playback tab page of the iClient S100, the time superimposed on the image is different from that displayed on the timeline.
Possible Causes
- The time zone of the camera is different from that of the server.
- NTP is not enabled for the camera.
- The NTP server parameter of the camera is incorrectly set.
Solution
- Check whether the camera and the server are in the same time zone.
- Log in to the OMU portal as the admin user. (
 Logging In to the OMU portal)
 - Choose .
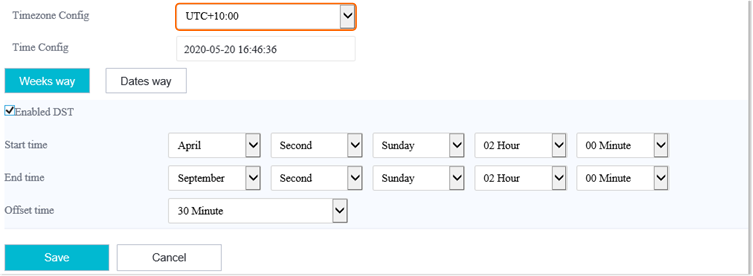
- View and record the time zone of the server, as shown in Figure 6-59.
- Log in to the camera web system as the admin user. (
 Logging in to the Camera Web System)
 - Choose .
- Check the time zone of the camera, as shown in Figure 6-60.
- Check whether the camera and the server are in the same time zone.
- If so, go to 2.
- If not, change the time zone of the camera to that of the server, and go to the next step.
- Check whether the fault is rectified.
If so, no further action is required. If not, go to the next step.
- Log in to the OMU portal as the admin user. (
- Check whether NTP is enabled for the camera.
- If it is an HWSDK- or ONVIF-compliant camera, log in to the corresponding OMU portal and check whether camera NTP synchronization is enabled.
- Log in to the OMU portal as the admin user. ( Logging In to the OMU portal)
- Choose System > Advanced Configuration.
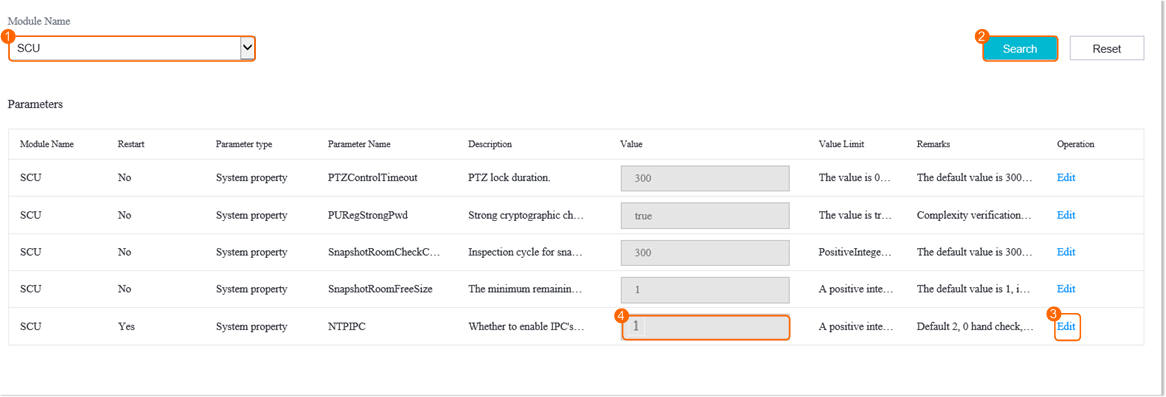
- Set NTPIPC to 1, as shown in Figure 6-61.
- Check whether the fault is rectified.
If so, no further action is required. If not, go to 3.
- Log in to the OMU portal as the admin user. (
- If it is a GB/T 28181-compliant camera, log in to the camera web system and check whether NTP is enabled.
- Log in to the camera web system as the admin user. ( Logging in to the Camera Web System)
- Choose .
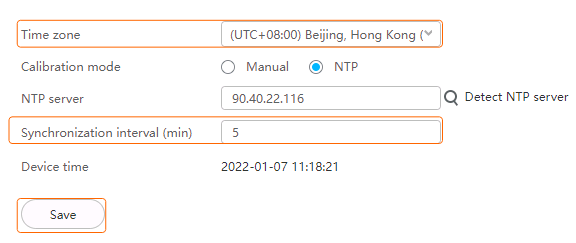
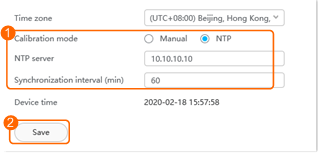
- Check whether Calibration mode of the camera is set to NTP.
If so, go to 3. If not, go to the next step.
- Configure NTP time synchronization, as shown in Figure 6-62.
- Check whether the fault is rectified.
If so, no further action is required. If not, go to 3.
- Log in to the camera web system as the admin user. (
- If it is an HWSDK- or ONVIF-compliant camera, log in to the corresponding OMU portal and check whether camera NTP synchronization is enabled.
- Check whether the IP address of the NTP server set in the camera web system is the same as that of the device.
- If not, change the IP address of the NTP server in the camera web system and check whether the fault is rectified.
If so, no further action is required. If not, contact technical support.
- If so, contact technical support.
- If not, change the IP address of the NTP server in the camera web system and check whether the fault is rectified.
Failure to Search for Server Recordings of an Online Camera
Symptom
When you log in to the iClient S100, select an online camera and search for its server recordings, the system displays a message indicating that no recording is found. The recording plan settings and execution status of the camera are normal, and each module of the server is running properly.
Possible Causes
- The time or time zone of the server is different from the actual time or time zone.
- The time zone of the computer where the iClient S100 is installed is different from that of the server.
Solution
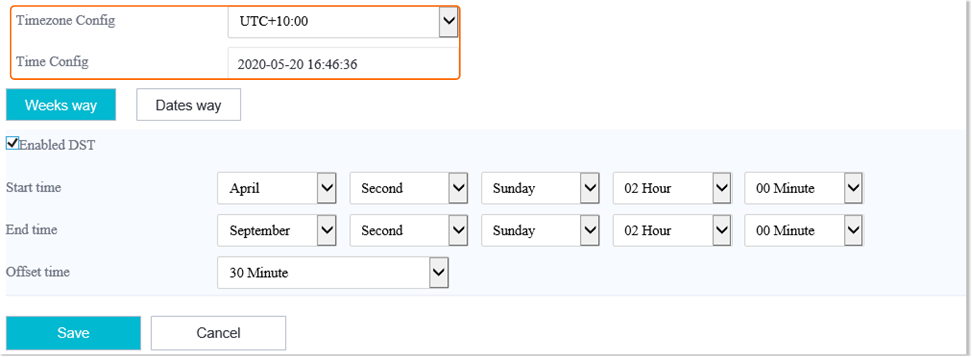
- Check whether the time and time zone of the server are the same as the actual time and time zone.
- Log in to the OMU portal as the admin user. ( Logging In to the OMU portal)
- Choose .
The page shown in Figure 6-63 is displayed.
- Check whether the time and time zone of the server are the same as the actual time and time zone.
- If so, go to 2.
- If not, correct the time and time zone of the server and go to the next step.
- Check whether the fault is rectified.
If so, no further action is required. If not, go to the next step.
- Log in to the OMU portal as the admin user. (
- Check whether the time zone of the computer where the iClient S100 is installed is the same as that of the server.
- Log in to the computer where the iClient S100 is installed.
- Click time in the lower right corner of the desktop. In the window that is displayed, click Date and Time Settings.
- Check whether the computer and the server are in the same time zone.
- If so, contact technical support.
- If not, change the time zone of the computer to that of the server, and go to the next step.
- Check whether the fault is rectified.
If so, no further action is required. If not, contact technical support.
Device Management Faults
Failure to Verify a Camera When You Follow the Wizard to Add It
Symptom
When you attempt to add a camera by following the wizard, the verification fails repeatedly.
Possible Causes
- The user name and password configured for adding the camera are different from the actual ones.
If the user name and password fail to be verified for five consecutive times, the system automatically locks the account for 5 minutes by default. During the lockout period, the camera cannot be added.
The causes of the incorrect user name or password are as follows:
- The user name and password are not changed, but either or both of them are incorrectly entered when you add the camera following the wizard. As a result, the verification fails.
- The user name, password, or both have been changed. However, you still entered the old user name or password to add the camera. As a result, the verification fails.
- The camera software version is earlier than the required. In this version, the HWSDK protocol uses an insecure RSA encryption suite. By default, the device does not support connection to HWSDK-compliant cameras using the insecure RSA encryption suite.
Solution
- Wait for 5 minutes and enter the user name and password again.
- If the camera is successfully added, no further action is required.
- If the fault persists, the camera password may have been changed. You are advised to log in to the camera web system, reset the password, and add the camera again.
The account may be locked again after multiple failed attempts. You are advised to wait for an account lockout period after changing the password. Then add the camera again.
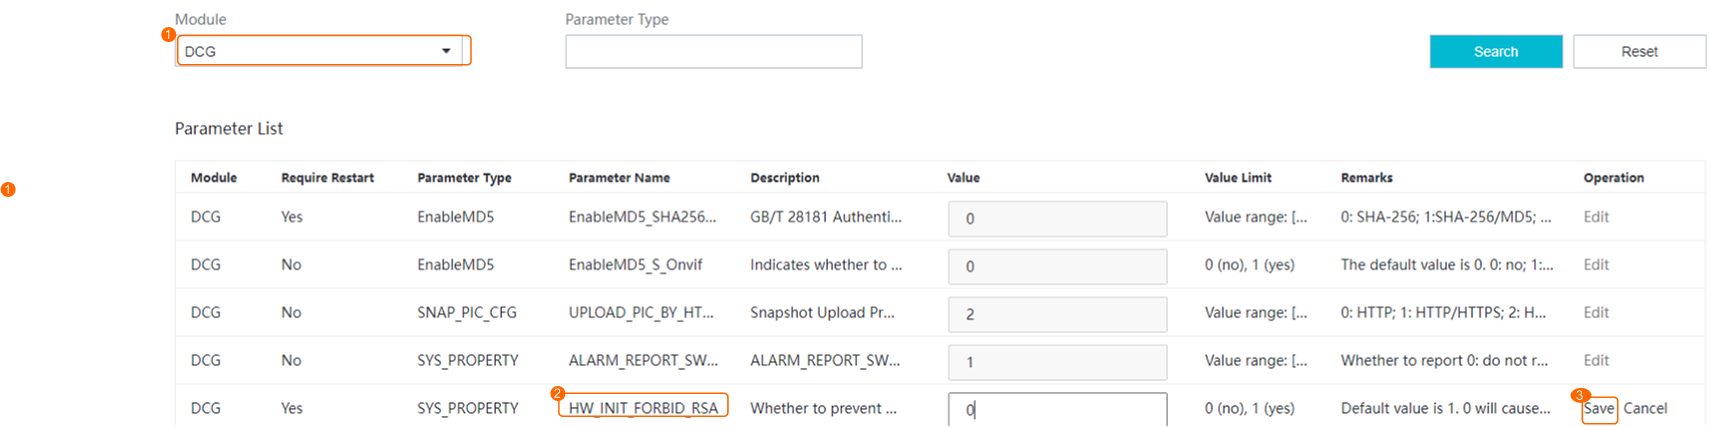
- Log in to the OMU portal and set HW-INIT_FORBID_RSA to 0.
If the insecure RSA encryption suite is not disabled, security risks exist. You are advised to disable the insecure RSA encryption suite and upgrade the camera version.
- Log in to the OMU portal as the admin user. ( Logging In to the OMU portal)
- Choose System > Advanced Configuration.
- Set HW_INIT_FORBID_RSA to 0, as shown in Figure 6-64.
- Log in to the OMU portal as the admin user. (
Hardware Faults
System Stays on the Startup Screen After Startup
Symptom
After the device is powered on, the system stays on the startup initialization screen for more than 10 minutes. The fault persists after the device is restarted for multiple times.
Possible Causes
The system program of the device is damaged.
Solution
Contact the service provider.
Power Indicator Is Off and No Startup Screen Is Displayed After the Device Is Powered On
Symptom
After the device is powered on, the power indicator is off and no startup screen is displayed. The fault persists after the device is restarted for multiple times.
Possible Causes
- The power adapter has no power supply or is damaged.
- The device is damaged.
Solution
- Check whether the power adapter is properly connected to the device.
- Check whether power is properly supplied to the socket.
- Contact your service provider if the items in the preceding checks are normal (indicating that the device may be damaged).
Device Restarts Repeatedly
Symptom
- The device restarts repeatedly after being powered on.
- The device restarts repeatedly during use.
Possible Cause
The system program of the device is damaged.
Solution
Contact the service provider.
HWT-IVS1800 Cannot Be Logged In After Factory Settings Restoration Due to Partition Table Modification
Symptom
After the partitions mmcblk0p4 to mmcblk0p8 are merged into one, you press and hold the reset button on the panel to restore the factory settings. Then you cannot log in to the HWT-IVS1800 (no buzz generated during the startup).
Fault Locating
Symptom |
Locating Method |
Possible Causes |
|---|---|---|
After the factory settings restoration, the HWT-IVS1800 cannot be logged in and the Lixun system enters the emergency mode. |
Provide a serial port for you to log in to the HWT-IVS1800 in the fault environment. During login, an error message "Dependency failed for" is displayed, indicating that partitions fail to be mounted to directories such as and in the file system. |
In (configuration file for mounting partitions), the attributes and mounting directories of each partition are recorded. During secondary development, you modify the file, merging partitions mmcblk0p4 to mmcblk0p8 into one in the system. After factory settings restoration, the file is restored by the backup partitions (mmcblk0p1 and golden) to the original configuration file. In this case, the inconsistency between the integrated mmcblk0p4 partition in the system and the four partitions (mmcblk0p4 to mmcblk0p8) in the configuration file makes partitions mmcblk0p5 to mmcblk0p8 fail to be mounted. To rectify this fault, create partitions mmcblk0p5 to mmcblk0p8 in the system based on the HWT-IVS1800 partition table, and press and hold the reset button to restore the factory settings. Then the HWT-IVS1800 can be logged in properly. |
When you restart the HWT-IVS1800 with partitions mmcblk0p4 to mmcblk0p8, the Lixun system enters the emergency mode. |
Check the log printed during the startup process and find that Dependency failed for /StaticFeature is displayed, indicating that the mmcblk0p8 partition fails to be mounted to the specified directory. |
In the script for restoring factory settings, the mmcblk0p8 partition is created with specified space. According to the log, the mmcblk0p8 partition fails to be created because the specified reserved space for this partition is smaller than the required space. To rectify this fault, reserve 6 GB space for the mmcblk0p8 partition based on the HWT-IVS1800 space allocation scheme. Then the system can be started properly. |
Conclusion
The partition table modification during secondary development causes the inconsistency between the actual partition configurations in emmc and the configurations required by the fixed partition table in golden. After the factory settings restoration, the configurations in fstab are changed. As a result, partitions in the file system fail to be mounted, and the Linux system that enters the emergency mode cannot be logged in to using SSH.
Solution
Run the parted command to restore partitions in emmc based on the original HWT-IVS1800 partition scheme.
parted -s /dev/mmcblk0 mkpart p4 ext4 4608MiB 5632MiB
parted -s /dev/mmcblk0 mkpart p5 ext4 5632MiB 6656MiB
parted -s /dev/mmcblk0 mkpart p6 ext4 6656MiB 13312MiB
parted -s /dev/mmcblk0 mkpart p7 ext4 13312MiB 23552MiB
parted -s /dev/mmcblk0 mkpart p8 ext4 23552MiB 29696MiB

Do not run the fdisk command to restore partitions. Otherwise, the module for restoring factory settings cannot obtain partition names when invoking parted -l -s. As a result, the Linux system enters the emergency mode.
The partition list after restoration is as follows:
Device Start End Sectors Size Type
/dev/mmcblk0p1 2048 1048575 1046528 511M Linux filesystem
/dev/mmcblk0p2 1048576 5242879 4194304 2G Linux filesystem
/dev/mmcblk0p3 5242880 9437183 4194304 2G Linux filesystem
/dev/mmcblk0p4 9437184 11534335 2097152 1G Linux filesystem
/dev/mmcblk0p5 11534336 13631487 2097152 1G Linux filesystem
/dev/mmcblk0p6 13631488 27262975 13631488 6.5G Linux filesystem
/dev/mmcblk0p7 27262976 48234495 20971520 10G Linux filesystem
/dev/mmcblk0p8 48234496 60817407 12582912 6G Linux filesystem
Other Faults
Symptom |
Possible Cause |
Solution |
|---|---|---|
The power button is unavailable. |
The power button is damaged. |
Contact the service provider. |
The reset button is unavailable. |
The reset button is damaged. |
|
The USB flash drive or mouse cannot be identified. |
|
Remove and insert the USB flash drive or mouse again. If the fault persists, replace it with a normal USB flash drive or mouse. For example, insert a normal mouse into the USB port of the device.
|
The indicator of a network port is off, and online devices cannot be identified after network cables are connected. |
|
|
The display port has no output, and no image is displayed. |
|
|
No hard disk is detected. |
|
|
The audio port has no audio. |
|
Disk Faults
Symptom |
Error Code |
Error Message |
Solution |
|---|---|---|---|
|
109100017 |
The space of the root directory is insufficient. |
Contact your service provider. |
|
159150022 |
The number of disks is 0. Check the number of disks. |
Wait for 2 to 3 minutes. If the number of disks is still 0, contact your service provider. |
Disk initialization may fail due to causes such as power-off. |
159150024 |
Disk-related operations are interrupted. |
Perform the operations again. |
Online disk capacity expansion may fail due to causes such as power-off. |
159150024 |
Disk-related operations are interrupted. |
Contact your service provider. |
Failed to initialize the disk. |
159150034 |
Before initializing a disk, format the disk. |
|
Failed to initialize the disk. |
159150035 |
Failed to initialize the disk because the disk capacity is less than 2 TB. |
Replace the disk with a disk whose capacity is greater than 2 TB. |
|
159150203 |
Failed to partition the disk. |
Contact your service provider. |
159150204 |
|||
159150205 |
|||
159150208 |
|||
|
159150032 |
Failed to mount the system partition. |
Contact your service provider. |
|
159150031 |
Failed to mount the data partition. |
|
|
159150001 |
The number of disks is insufficient. |
|
Failed to expand the disk capacity online. |
159150006 |
Disk capacity mismatch. |
Ensure that the capacity of the new disk is the same as that of the original disk. If they are different, replace the disk. |
Failed to pass the disk health check. |
2 |
Disk is in black list. |
Replace the disk. For details, see Replacing HWT-IVS1800-D08/D16/E08/E16/LLM Disks. |
3/11 |
SMART test failed. |
Replace the disk. For details, see Replacing HWT-IVS1800-D08/D16/E08/E16/LLM Disks. |
|
4/5/6 |
Disk IO check failed. |
Replace the disk. For details, see Replacing HWT-IVS1800-D08/D16/E08/E16/LLM Disks. |
|
7/8 |
Low IO performance. |
Replace the disk. For details, see Replacing HWT-IVS1800-D08/D16/E08/E16/LLM Disks. |
|
Disk compatibility alarm. |
9 |
Disk has bad sector. |
NOTE:
If you continue to use a disk with bad sectors, exceptions such as data loss may occur. |
1 |
Disk not support RAID. |
NOTE:
The RAID mode requires enterprise-level disks. Monitoring-level or desktop-level disks affect data security and may cause system data loss or corruption. |
|
10 |
Unknown compatibility. |
NOTE:
If you continue to use disks with unknown compatibility, exceptions such as system instability and data loss may occur. |
|
A message is displayed, indicating that the disk is being checked. |
12 |
Checking. |
A disk is being checked. After the disk check is complete, click OK. |